
 People have asked me about this one but I have never seen instructions on how to do it. I haven’t looked in awhile so maybe someone has published a how-to by now. It’s simple but kind of counter-intuitive at a couple of points. I learned by studying the original weave on a chair and just messing around with a piece of cord trying to copy it—and even then it took me at least half an hour!
This is my original drawing and it is copyrighted; you are welcome to link to it or include the diagram on your site as long as you credit Modern Chair Restoration. Unauthorized sale of the diagram or its inclusion in materials for sale is absolutely forbidden.
This is only for the part of the weave that is different from other patterns. The information here is not intended to be instruction on how to weave the entire chair. The weft (side-to-side strands) are woven like other chairs where you have to wrap completely around the side rails.
Obviously this is a slightly exploded view. In reality you will need to pack the cord as tightly together as possible on the rails as you work, once you’ve finished each step and have gotten all the slack out.
NOTE: One of the rails is always wrapped as you make the warp strands. That’s how you get the cord from one pair of warp strands to the next. The second rail is wrapped separately and if there is only a small gap between the back and seat of your chair, this is much easier to do when the first rail that you wrap is at the top of the back (or front of the seat)!

Additional tips:
- You must first figure out how much cord you need for the entire warp (the vertical strands on the chair back; front-to-back strands on seats). Do this with a scrap piece that is a few yards long and figure out how many warp strands you need, using the original weave as a guide, or find a good photo online and count the pairs. Then figure out how many wraps are needed on the rail and calculate that total length of cord. Add the two together. Because this weave is common on so many different styles of chairs, I’m not going to include lists of measurements. You’ll have to do the math yourself.
- MARK where the pairs of warp strands are on both rails. There should be an odd number on each and numbers must match on top and bottom rails. Make a single line on the top of each rail and then simply make sure that each cord in the pair is positioned on either side of the mark.
- This is a LOT of cord and it’s usually not possible to use a shuttle on Yugoslavian chairs, so you must be able to keep the cord neat and contained, otherwise you end up with tangles that are frustrating and time-consuming to undo. I find that a hank is the best way (more info below). If the gap between the back and seat is big enough to pass a full shuttle through, then by all means use a shuttle!
- Yes, this needs to be all one length of cord, at least for the back of a chair where it’s hard to hide tacked joints neatly and impossible to hide knots at all. With seats it is possible to hide a joint, though I prefer to do it all with one strand.
- If at all possible, schedule your weaving when you can devote several days in a row to it. If you do a little here and a little there, you will most likely have to relearn it each time and that will end up adding hours to an already long project. It’s the kind of thing that gets easier and faster with lots and lots of repetition—at least until you get to where you really think you know what you’re doing so you slack off on your focus and start making mistakes! (Ask me how I know this.)
- Work from left to right as shown in the diagram. It’s possible to work from right to left but you have to tighten and then loosen the loops, or something awkward like that. I did it once and vowed never again.
- Do each pair of warp strands as shown above, leaving lots of slack because you will need to fit the entire bunch of cord through two different loops. When all those steps are done, start tightening from the left and work towards the right. Use a spring clamp to hold the cord taut if necessary, then wrap around the rail until you get to the mark for the next pair of warp strands.
- You can contain your gigantic length of cord in one of two ways, either in big loops or a coil, but both must be bunched together in the center and secured with something. Covered elastic is best (get some covered hair elastics at the grocery store) but a rubber band will do. Non-elastic ties have to be readjusted too often for my taste and they tend to loosen when you don’t feel like stopping to tighten them again. The coil will not work if you just tie it around the side. That would have to be untied and retied every every time you need to pull more cord out—which will be often.
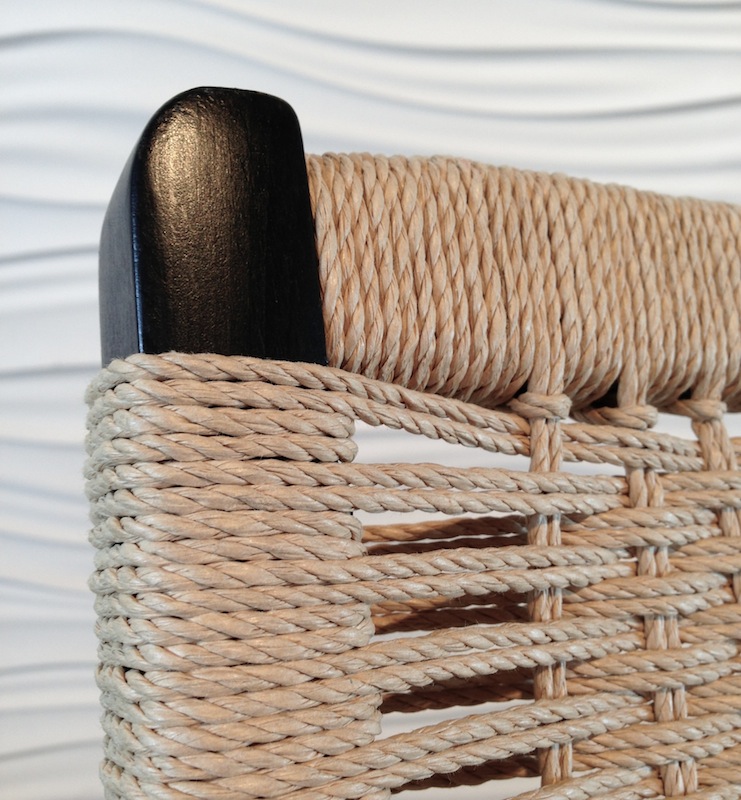
- Many Yugoslavian chairs and others are woven with two or three pairs of warp strands in a row. I like to do single pairs because the loops look more tidy that way. If you want that look, space them more closely on the rails (like four wraps between each pair, as in the photo at top), otherwise you end up with not many warp strands and that may make for a weaker seat. I don’t think strength is an issue for the back.
Have fun!
September 2020: I’ve been asked how to do what I call a hank of cord. It’s pretty simple:

Thank you so much for the looped warp weave instructions.
I’m finally getting the courage to redo 3 Japanese versions of this folding chair that have been waiting in my attic for the past 25 years.
Would you be able to give any advice on how to do the weft on the seats through the narrow slit on the seat side rails?
Thread the cord through the slot. Once you start undoing the old cord, it will be very obvious how it was done. Have fun!
I figured out how to do the warp weave on the Yugo rocker without having to pass the hank through the loop. But you have weave both ends at the same time, so it gets a bit challenging just making sure everything is tied off during the work. Not as easy as a Moller, but it’s straight work without having to go back and tighten. No crossed lines – it’s all very clean. Still don’t get the weft. I guess you pull a double all the way through and back again and then tie off and continue. I tested it out on a jig for now.
I can’t picture what you’re talking about with weaving “both ends at the same time” and “no crossed lines” on the weft. As for the weft, yes—you do have to weave with a cut length that is doubled and you have to pull it all the way through on each pass. I don’t tie each new strand on, I tack them (using 5/8″ wire nails now–upholstery tacks are traditional but I discovered wire nails hold as well or better and are less noticeable). If you ever get a chance to weave a Wegner CH23, they require the same technique (as do a few other chair designs—anything with this weave but no L-nails or other fasteners for hooking the weft under the seat). It takes longer than weaving off the coil but if you cut a manageable length (20 yards is about my max) you can minimize annoying tangles.
how thick is the cord you used?
I use the most common diameter Danish paper cord, which is about 1/8″.
Thanks for these detailed instructions. Trying to restore a Yugoslavian rocking chair and haven’t done weaving before. Can you describe how much tension you put on the warp? Is the weft pulled to a similar tension? And one last question, for the back do you tack the weft on the inside of the rail and try to hide the nail with the loop of doubled cord that goes around the rail? Thanks again for any advice.
The warp strands shouldn’t sag if you can help it, but this is hard to do. If they sag a little, don’t worry about it, it’ll get taken up when you start weaving the weft.
There’s a limit on how how tightly you can pull a weft strand and still push it snug against the weaving you’ve already done. The first pair is usually straighter but that’s only because there’s not an opposing pair right next to it. It’ll make sense when you start weaving. Just pull the weft strands as tight as you can while still packing the them in snugly. The wraps on the sides should cover the frame completely, no wood showing between them.
I tack the loop end of the weft inside the rail. Tacking the loop end rather than the two cut ends looks neater. It’s still visible but at least it’s minimal.
I’ve also switched to just splicing in new strands instead of tacking, farther down the frame. Just cut the plies on an angle at different points, twist the new strand to the old one with ply ends meeting, dot with glue as needed, then wrap a bit of the paper from an unfurled bit of scrap cord around the join. You will obscure the texture of the cord a bit (less than you think, though!) and it may seem time-consuming and fussy–but I think it’s a lot easier than trying to tack the ends of the old cord AND the loop end of the new cord on the inside of the post where there’s no room to maneuver. Looks way neater, too. The splice pretty much disappears in the finished weave.
I just stumbled upon this today. I am redoing a Ringstol chair by Illum Wikkelsø. I have the spokes and the wraps to keep them spaced properly complete. The weavers are the issue, and I see from previous questions and responses that the entire length Must be woven as doubles at the same time! This seems like a true nightmare to me.
The twisting of the doubles and the need to straighten them with each pass seems incredibly time-consuming. Am I missing something here, or is that actually the only way to do it?
Yes, that is the only way to do it when the cord is wrapped around the side rails of the frame. But don’t worry, it’s not that hard. You lead with a loop. I have never done this particular chair but it’s pretty much like the Yugoslavian folding chairs, just a different shape.
You can do whatever length cord you’re comfortable with. I do about 20 yards (20 meters) which folded is only 10 yards to pull all the way through with each pass (then a double wrap around the side, then back again). Since the back of the chair is visible, you want to join the next 20 yard length as neatly as possible. You can hunt for photos of the back view of this chair online to see how it was done originally. I found this one:
https://sidecarfurniture.files.wordpress.com/2014/04/illumback.jpg?w=860
It looks like he ended with a loop right in the center back of the post of the frame, the looped the new length through that. It’s hard to tell for sure since the photo is not super high resolution. What I would do is just splice the new piece to the last one (staggered so that you don’t have two splices next to each other). Unfurl a bit of the end of both old and new ends, cut the plies to uneven lengths, twist the two together so that you have only 3 plies over the whole length of the splice. Work a bit of white glue into this. Then smooth out a rectangle of paper from a bit of paper cord, spread it with white glue, and wrap it tightly around the joined cords. Let it dry for 10-20 minutes, then repeat for the end of the cord in the pair. It’s rather picky work but you’ll have an almost invisible splice that is very strong.
I am also trying to redo a Ringstol chair by Illum Wikkelsø. However, I have never done any type of caning or weaving before and am still trying to learn the terminology. Just wanted to see if you were able to restore yours and if y’all have any tips for me. Thanks!
I am going to use the Danish paper cord and L-shape hooks to weave a chair seat
( double side rails )and back. Do you have instructions to weave the seat with double side rails? What spacing should the nails be? I have seen the back of chairs weaved on both side, how would you do that?
Thanks.
I don’t have instructions for any weave other than the one here. I learned to do the double rail seats from the book “The Caner’s Handbook” by Jim Widess (still in print and you can get used copies on ebay). There may also be tutorials online by now; I don’t know, I don’t monitor that kind of thing.
Nails for seats are usually just over an inch apart (26-28mm) starting 1/4″ (6mm) from the corner, and there should always be an odd number of them. You must have the same number of nails on the front and back rail; if the back rail is shorter, place the nails a little closer together.
If by chair backs that are woven on both sides you mean like the Wegner CH25 chair, that’s kind of complicated to explain here. Basically you need to figure out a way to hide the knots. On the CH25 they are hidden behind the weave variation that you see on the back but this also involves threading cord through slots in the top and bottom rails at that point. There may be other ways of achieving the weave but that’s how Hans Wegner dealt with it.
If you just mean how do you weave a back where there are no L-nails, basically you just go around the side post then go around it again which will bring your cord out on the right side. Then just weave across.
You MUST use cut lengths to do this kind of weaving when there are no nails. You can’t weave off the spool. Join new lengths by nailing to side rails as discreetly as possible, or knotting and hiding it as best you can, or by splicing which is what I do (stagger cut plies, retwist together, dot with glue, then wrap with unfurled paper from scrap cord–coat paper with glue before wrapping. Let dry for 15 minutes before proceeding with weave.)
Thank you for your instruction on the Yugoslavian folding chair! How much cord (3mm?) do you calculate to weave such a chair?
I think you’ll need 6 lbs at most. Most of the places that sell it offer 2-lb coils so three of those should be fine. Good luck!
First off, thanks for posting this. It’s much appreciated cause this sort of weaving seems to be a very arcane skill. I’m attempting to redo a Yugoslavian folding chair as pictured. I’ve practiced the warp with a shorter bit of cord successfully, but when it comes time to use the massive length of cord, it’s proving unwieldy. Disclaimer: I’m new to weaving. When making a hank or large “coil” of the full length of cord, where do I place the hair ties? It seems to me that by placing a hair tie, rubber band, constrictor knot etc. around the coil at any point, I’m rendering it unable to uncoil properly and every time I want another loop of cord I’ll have to manually push it through the hair tie for use. In other words, the cord wont flow nearly as seamlessly as it would from a shuttle.
I just added a graphic on how to do this (scroll up to see it). It’s super easy. Just watch out for a loop catching on another loop as you pull. This happens more easily as you use up the cord in the hank. If it starts catching on itself more often, then just redo the hank and make the rubber band/elastic tighter as needed.
Hello. Thank you so much for this guide, it’s super helpful. I have a question: when you complete the first strand and do the upper warp you go behind the upper rail to keep wrapping it, but since you are going behind it, the direction of the cord while you wrap is not how you show it on the sketch. Basically, you show the cord going behind the rail when finishing the first upper warp and coming from behind the rail when starting the next one, how is that possible? There’s may something that I’m not seeing.
I see what you’re saying, but if you just look at the diagram where the exploded view starts, I think you’ll understand how to do it.
Thanks for this great info. I have 2 of these to do once I finish 6 Volther dining chairs. I have a question about wrapping the bottom rail of back (back rail of bottom). You indicate that these are wrapped separately. Does this mean that these are yet another single strand? How should the transition from one section to another be handled as you have to pass the loops you have already created? I hope this makes sense.
Yes, the wraps on the bottom rail are done with a single strand but you can use a shuttle for this since there are no small gaps to fit it through, at least not on the chairs that I’ve done.
You don’t need to thread the cord between the loops of the warp strands. I just cross it over in the back on the top side of the rail. I like the neat repetition of these angled wraps. The 5th photo down in this post shows how this looks. You can see how it looks in the front too if you keep scrolling down, and there are a couple of more photos of the back.
If you don’t want the crossover to show, just do it on the underside, though then the underside will have a bump of cord every inch and a half—but this would only be visible if you have a really low angle view of the chair (like if you’re lying on the floor or it’s on a stair landing as you’re going up the stairs).
These crossed strands stay in place as long as you do the wraps as tightly and evenly as possible. There should be no slack in them at all.
hope this helps.
Thank you! Looking forward to this project. I’ve had these for 30 years as they fell apart. Your pics have inspired me!
Tratándose de que ustedes conocen el material, mi pregunta es : cómo se.pueden lavar esas sillas tejidas
To clean Danish paper cord:
1. Grate a bar of Ivory soap
2. Dissolve 2 tablespoons of grated soap in 1 quart (1 liter) of hot water. Make sure no solid bits of soap remain.
3. Let cool a bit, then sponge the soapy water onto the paper cord. Do NOT scrub the paper cord. Get the entire seat evenly damp but not dripping wet. The cord will look loose and sagged when wet–don’t worry, it will tighten up again when dry.
4. Do NOT rinse. Leave the soap mixture on to dry. Use a fan to speed up the drying.
5. Do NOT sit in the chair until the paper cord is completely dry.
This will help with light soiling. Deeper, darker stains may need several treatments. Some stains may be permanent.
This is awesome. Thank you for sharing. I’m looking to start weaving but we don’t have Danish cord readily available here. Would you happen to have any advise on where to get it? Tried looking it up earlier but nothing promising.
Thank you.
Where are you located? It’s not hard to find in the US, though shipping can be very expensive if you live far from the source.
You also don’t mention how much you need, whether you’re doing one chair or a set of six or eight. Cord is generally sold in two sizes of coils: 2 lb. which is enough for one dining chair (most types, anyway–some might need a bit more than that) and 10 lbs. Make sure you’re buying enough for your project!
There’s a guy in Denmark who sells it in his Etsy store and directly to public, too–https://www.etsy.com/shop/WebbsMidCentury? I’ve ordered from him because it was actually less expensive even with shipping than the nearest dealer in the US. I’m not sure if he ships everywhere in the world.
There are vendors in the UK, some of whom are on Etsy.
You could check also with Design Restoration Spares in Germany. I’ve bought parts from them and they’re really nice to deal with. I believe they ship all over the world but do check first.
Hope this helps!
I was so excited to be gifted two of these chairs.
The cording is in excellent shape but the varnish has flaked off the wood.
I would appreciate suggestions on how to take care of this.
Thank you.
Sincerely,
Theresa
The finish on your chairs is most likely lacquer, not varnish. Varnish wears off evenly but lacquer will chip and flake as it ages. There is no good way to make a flaking lacquer finish look good again short of removing it and starting over.
There are two ways to remove it, both more easily done if there’s no cord on the chair, but you can still do it with the weaving in place.
One is to dissolve the lacquer with acetone. Acetone is hard to work with because it evaporate so quickly and it has a low surface tension so it tends to run off very easily. You will have to be super careful not to let it get on the cord. That would mean always working downhill from where the cord is—easy to do on the legs, harder to do on the corners of the seat and back frames. Dampen a paper towel with it and keep going over the exposed wood over and over, re-dampening the paper towel as needed. The finish dissolves immediately but the acetone dries within seconds and whatever acetone isn’t wiped off in the time dries too. But you can get all of it off if you keep at it.
When you can’t see any sheen at all anymore on the wood and a paper towel dampened with acetone comes away clean, there is no more acetone left on the wood.
The corners where two frame parts meet will be tougher to clean up.
You have to wear chemical-resistant gloves to do this, and you must do it in a very well ventilated area, preferably with a respirator.
The other method is to sand it off. Start with 80 or 100 grit, then go to 120 or 150, then 220. This is messy, very dusty, and you should wear a dust mask to keep from inhaling the powdery lacquer that you sand off. Remove all dust residue when finished with a tack cloth (available wherever paint is sold).
Finish with wipe-on polyurethane in satin sheen–it is easy to control where you put it and easy to prevent drips.
I finally got around to weaving the chair after removing a crappy lacquer and oiling the frame. I really have no idea what I’m doing, but I finished the upright part and it looks half-decent. I have a follow up question though. My weft strands began perfectly level and parallel and by the time I got to the top of the chair, there was sort of a pronounced downward sag in the middle of the weft (though the paper cord was itself very taut). Any idea why? I realized in hindsight that I had an even number of warp strands, rather than odd– maybe that’s contributing to the issue? I can’t think what else I’ve done wrong. Looking to remedy the issue before weaving the seat. I’d be happy to send a pic your way. Could not have done it so far without your help!
You have to pack the side wraps really, really tightly if you want to avoid that kind of sagging. There will always be m\ wrapped side strands for every 2 strands in the actual weave pattern.
You should always have an odd number of warp strands but this is so that the under/over pattern matches on the sides. It will not result in a sagging weft.
Hi,
Beautiful work and thank you for sharing it. Could you tell me, or direct me to where I could find out, how to do the weft part of this no-nail weaving. Particularly how to start and end and whether I could do it with more than 2 strands.
Thanks
The book “Caner’s Handbook” by Jim Widess is very helpful. I think it’s still available on Aamazon and Ebay usually has some used copies. That’s where I learned to weave paper cord seats.
There are also some youtubes and online tutorials. I don’t have links because I don’t keep up with all of this kind of thing but they’re easy enough to find. Best of luck to you.
How do you wrap the bottom rail. Thank you
Wrap the bottom rail after the top rail and warp are done. Just wrap a separate length of cord around and around the rail starting at one side. Tack the ends to the frame neatly on the underside and trim off the excess.
Dear Friends: My daughter and I have a very small chair and stool reseating shop in Columbus, Ohio. I have been caning for several years, doing mostly chair seats with traditional patterns and materials (7-step, herringbone, New England porch cane etc)
We also do fiber rush, Shaker tape, pressed cane, and flat reed) We have recently been presented a Hans Wenger folding chair which needs Danish cord weaving. I was delighted to find your wonderful instructions here on Pinterest. I do not have a computer, and have been using my phone screen to read your information. Is there any way I can order a set of printed instructions from you since we have no way to adequately view them on my phone? Thank you so much.
Glad to hear the instructions are helpful. Any copy store (Kinko’s, Staples, Office Depot, etc) in your area will be able to print them, or ask a friend or neighbor if they can do it for you. Your local library might be able to do it, too.
Thanks for putting this up. I just got a Ringstol chair as a restoration project. Trying to study how the cord was woven without naails had me up half the night. I was too scared to start undoing the cord to see how it was woven. I think I’ll make a frame and practice the weave on that until it’s second nature. It’s going to take a LONG length of cord, that’s for sure. Thanks again.